What is Prepi?
Prepi is a collaborative real-time web application to build and share assignments with your team. It is made to be fast and easy to use, but also powerful and flexible enough for more advanced use cases.
Do I need to read this?
Absolutely not. We'd recommend just jumping into it and playing around with it. You can always come back here later if you have a specific question.
Getting started
As a leader
- Login with Discord
- (Optional) Invite Discord bot to your server
- Create a new signup
- Edit roles & assignments
- Share signup
- Share URL directly with members
- Or use /signup link command with discord bot
You can also of course keep working on assignments after you share the signup.
As a member
Either you'll see an URL pasted or a signup embed is posted with the discord bot.
Shared URL:
- Login with discord on prepi.io
- Click signup (top right) and fill out the information
Discord bot embed:
- Click 1-click signup
- follow the link & login with discord on prepi.io
- Click signup (top right) and fill out the information
If your signups need characters, you can create them in settings.
Signing up
On the web
If you're allowed to sign up to a signup you can click the signup button (top right).
On Discord
Normally Discord signup embeds will have a few buttons below them:
- 1-click signup will signup with the the main signup set, alternatively if no sets are found it will use the character marked as main in settings.
- Signup will give you the option of instant signup or custom signup.
- Instant signup will sign you up normally with the selected character.
- Custom signup will allow you to customise your signup or to create more signup sets or characters.
- Absent will sign you as absent. You can also use this button to sign off.
Signing off
You can sign off by clicking update signup (top right) and selecting sign off.
Multi-character signups
Some signups will allow you to sign up with more than one character for flexibility. It is then up to the signup organiser to choose the character that fits best.
On the web
- Click the 'Signup' or 'Update signup' button in the top right corner.
- Click 'add alternate' button beside your preferred character.
- Choose your character by clicking one below.
- You can use a different spec by toggling 'use different spec' and selecting something else.
On Discord
- Click the blue 'Signup' button on a signup embed.
- Follow the normal signup process.
- At the end you will be given an option to select up to two alternate characters in a select menu or skip it with the 'Not now' button.
Signup sets
Signup sets are pre-saved signup setups you can use to make your signup process even faster. Your main signup set on the server you're trying to sign up for will be used for 1-click signup button.
You can create a signup set either:
- In settings under 'Signup sets'
- While in the signing up window on the web (if you already have a set on that server)
- After having completed a custom signup with alts with the Discord bot.
You can edit or delete your sets in settings.
Teams
Create a team
You can create a team in two ways:
- Web app: Go to teams and click create team then follow the steps.
- Discord bot: use the /team create command.
After you've created your team it is recommended you then create some tags, then go to 'team options', 'edit team' and update the section under 'Allow members with these Discord roles to join'.
Join a team
Go to teams and click join team. Prepi will then look for any teams that are connected to any of the Discord servers you're a part of. If the Prepi team you're looking for is not there you can logout from Prepi and login again and it should appear.
Team management
Member management
From your teams page, choose members tab then edit member. This will allow you to modify each members tags or remove them from the team.
Tag management
From your teams page, choose tags tab then edit tags. From here you'll be able to add more tags, turn on and off individual team permissions.
Team permissions
Different team tags can give you special permissions to create and manage resources on behalf of the team. For instance if you have the manage signups permission, you will see a new option under Create as when creating a new signup.
Allow members to join with specific Discord roles
First you'll need to create at least one tag. Then click admin options, edit team. Under Allow members with Discord roles, add a new row and fill in the info. You'll need know the ID to the Discord role you want to use. How to find Discord role ID.
Signups
Signup management
Creating a signup
You can create a new signup by going to signups and clicking new signup. Most of the options are fairly self-explanatory but for those who are not:
Template: pre-defined roles and assignments.
New signups goes to: choosing roster first will put new signups directly on the roster until the roster fills up. Bench will set new signups as benched and it is up to the admins to manually make sure the right members are put on the roster.
Signup visibility:
- Open which will not limit who can see the signup data in any way
- On roster which will only show content to members on the roster
- Admin will only show content to admins
Signups you create on prepi.io will automatically include roles and assignments. Signups made through the discord bot will not include roles and assignments until you scroll to the bottom of the signup and click add roles and assignments.
How to create signups directly from discord.
Templates
Templates are documents that when used will copy roles and assignments into a new signup. There are some pre-defined templates for you to play around with, but you can also create your own custom templates to re-use.
How to create a template
- Navigate to the signup you want to use as a template
- Make sure you are either the signup owner or have 'manage signups' team permission.
- Open the dropdown
- Select 'Template' then If 'Template' option doesn't appear, it might be because that signup doesn't have any assignments.
How to create a public template
Public templates are different from normal templates in that they can be copied by anyone, regardless of access level. They can also not be signed up to by anyone, does not have a roster or group comp.
- Navigate to the template you want to make public
- Make sure you are either the signup owner or have 'manage signups' team permission.
- Open the dropdown
- Select 'Template' then
How to save time with templates
Duplicating a signup
If you need a backup or something to refer back to you can signups by clicking admin options, selecting duplicate signup and giving it a new title and/or start time. You will be the owner of the new duplicated signup.
Archiving
Non-template events will be automatically archived 14 days after an event has concluded. Archiving means the roles and assignments will be deleted and the signup will move to the archive section in the signups overview. If you have a signup you want to keep roles and assignments data on - you need to convert it to a template.
Split signups
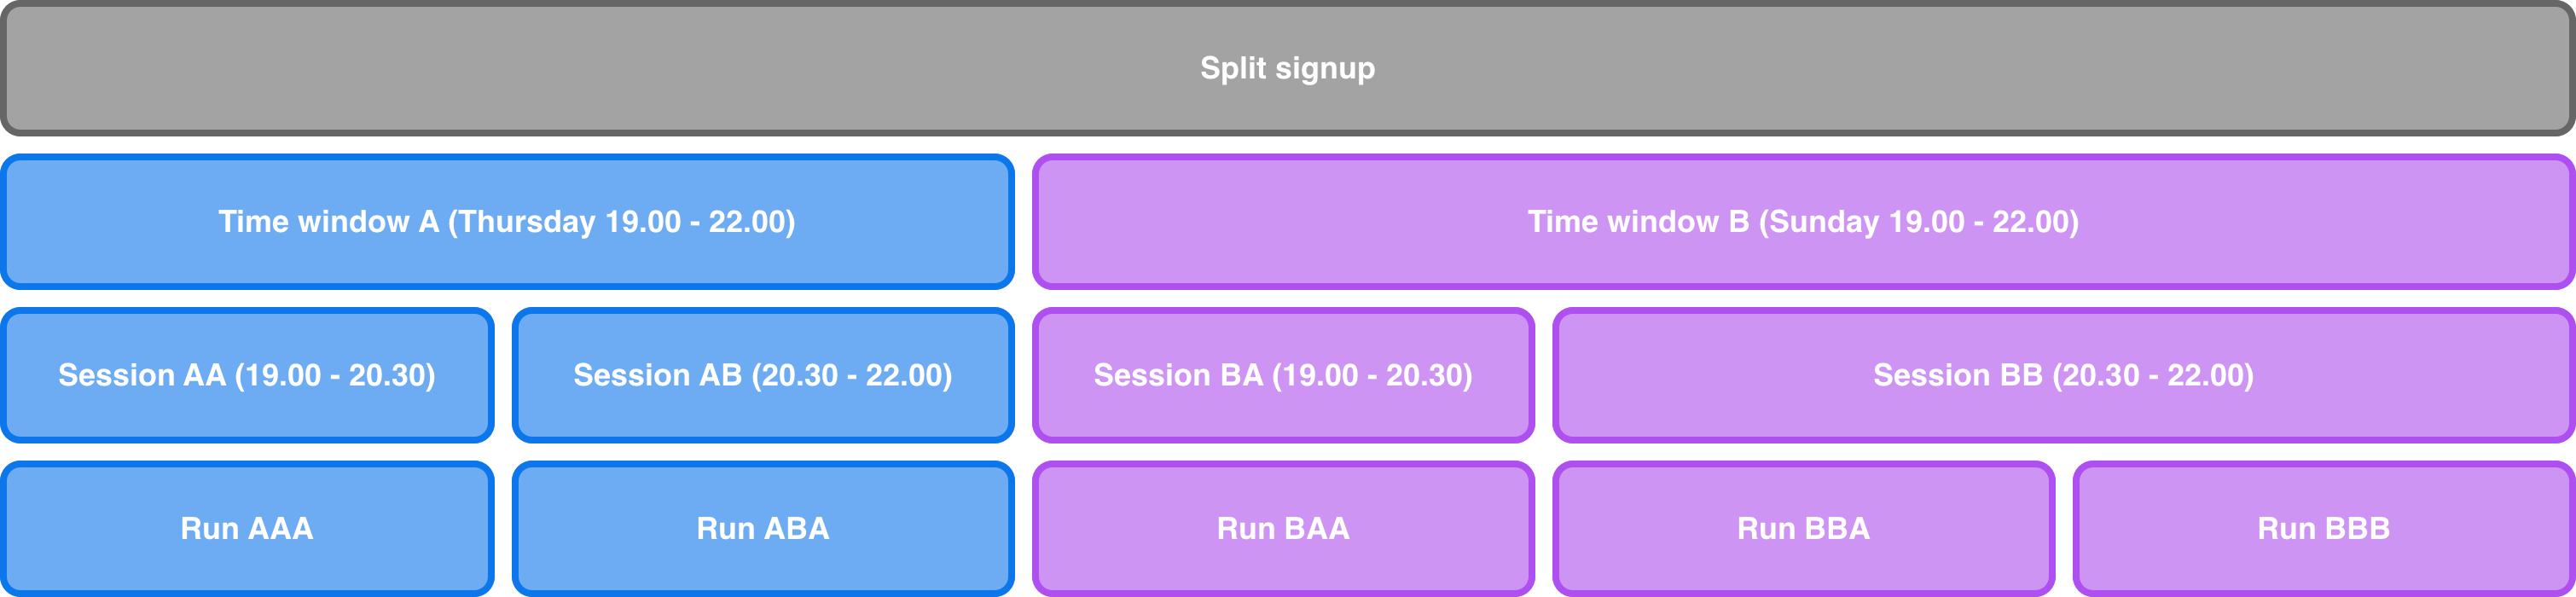
What is a split signup?
A split signup is a way to let members sign up to more than one time window, and then let the admins put whichever characters in however many runs the admin wants.
A split signup has one or more time windows.
A time window has one or more sessions.
A session has one or more runs.
Time windows
A time window is a period of time a member can sign up for. Admins can schedule as many sessions and runs within the time window as they want. A members characters can be moved around freely within the time windows the member signed up for. Each time window will get a color, and admins can see which characters can be moved into which time windows by looking at the colored stripes on the characters on the bench.
Sessions
A session is a period of time within a time window. There must be at least one session in a time window, but there is no upper limit. A member can maximum have one character inside a session.
Runs
Runs are the actual events. When any admin publishes for the first time, runs will be turned into individual signup documents. Likewise if a run is removed from the split signup and an admin publishes, the run document is deleted. When a run is created, it will copy properties from the split signup such as max size, title, roles and assignments from the split signup. Run members will always be updated to each run document when publishing.
Rules
- A members characters can only be put in sessions inside the time windows the member selected.
- A member can only be in 1 run per session.
- You cannot sign up to directly to a run, only the main split signup.
Create or edit a split signup
Split signups may not be available to all users. You may create a split signup by following the steps below:
- Open the dropdown
- Select
- Create as many time windows and sessions within those time windows as you want. By default there will always be two runs within the first time window.
Split signup distribution
You can utilize smart lists to define how you want Prepi to distribute your benched characters across your split runs. To learn more about smart lists, click here.
Run size
You can modify the values based on different run sizes: default, 25 man and 10 man. Whenever you update a value in default, only the default value will be set. If you update a value in 10 man, both the 10 man and the default value will be set. If a value is set by the run size you're currently watching it will be marked blue, if it is green it's a value inherited from the default
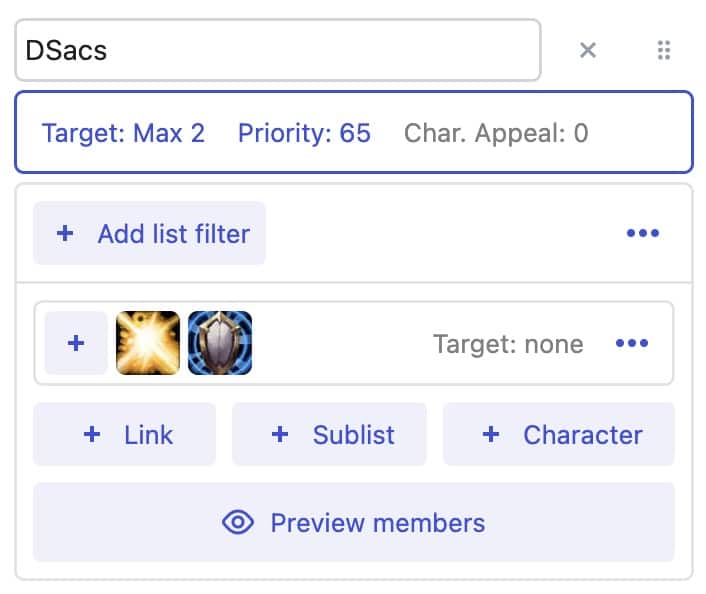
Target
Indicates how many characters with particular traits you want in each run. The distribution algorithm will only add characters if it has less characters in a run that matches. Meaning, if character Z has traits A and B and an earlier smart list wants 2 of trait A, and a later smart list wants 1 of trait B. The later smart list won't have to add any characters since character Z was already added and has trait B. A smart list target can work in a few different ways:
- Defined > 0 (blue) - The smart list will add characters until there are that many characters that match that smart list.
- Defined as 0 (blue) - Nothing will be added.
- Undefined with content targets (grey) - The smart list will try to add exactly the targets each item in the smart list.
- Undefined without content targets (grey) - Nothing will be added.
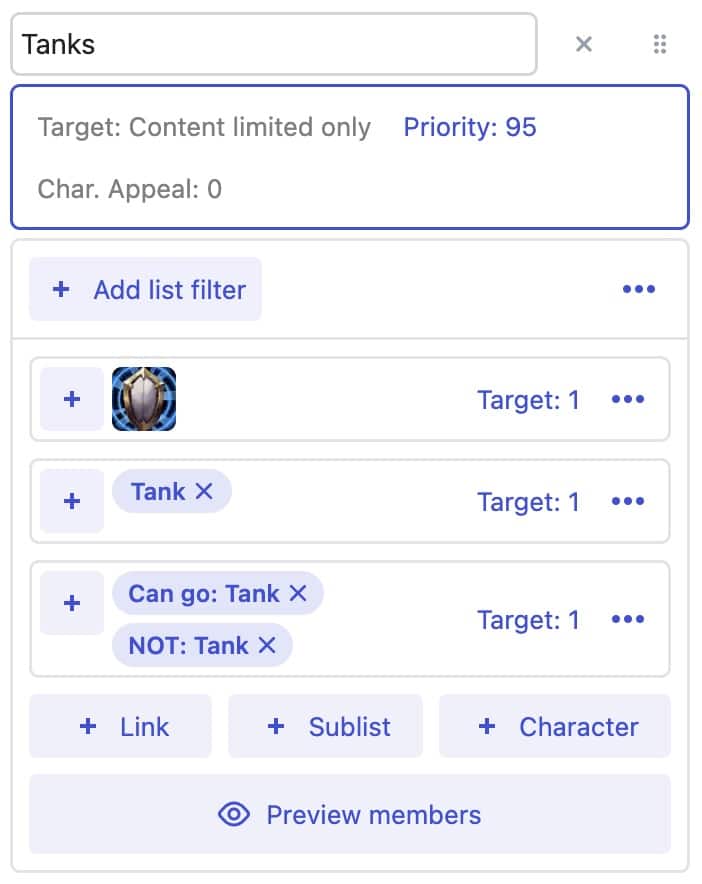
You can add targets directly to the individual items inside a smart list. These targets will be tried to be met first and exactly. If the smart list target is defined and over 0 and the target is not met from the items targets, the distribution algorithm will then try to add from the remaining pool of characters from the whole smart list.
Priority
The higher the priority of a smart list, the earlier the distribution algorithm will try to place it's characters.
Character appeal
Everytime the algorithm tries to place one of several otherwise equal characters in a run, it will choose the one with the highest character appeal. Priority and character appeal values are added together from every smart list the character is in for the final value.
Options
- Finish using legacy distribution algorithm - If a run isn't full after smart list distribution, it will randomly spread tanks, healers, melee and ranged into runs.
- Use characters with negative appeal - If disabled, all characters with negative appeal will be skipped.
Multi character signups
Switching between characters
To quickly swap between which of the members characters you'd like to use, simply hover over a member in the roster and click one of the icons on the right. You can see which of your members have signed with alternate characters with the +1 / 2 mark.
Show all alternates
If your signup allows for multi character signups (enabled by default) you will see a toggle to show x alternates top right on the roster. Clicking this will show you all the alternate characters which are marked with the link icon. When you're in this mode you can hover over any character and any of that members character will be highlighted so you can easily who's connected to who.
All the normal interactions still work as normal, with add & remove buttons and drag replace. However if you try to drag an alternate character of a member that's already on the roster, it will simply switch that members main and alternate characters.
Real-time & collaboration
The document owner and admins automatically sync all changes between each other. Those changes will not propagate to non-admins before one of the admins click save and publish.
Adding and removing admins
As an owner you can click on a member on the roster and select promote admin to add a new admin. Clicking on the admins below the signup title will allow you to remove them again.
Owner only actions
Adding or removing admins, deleting or archiving the signup are owner only actions that admins cannot perform. Everything else can be done by an admin or the owner.
Admin options
Archive - when you're done with a signup and no longer need assignments, but want to keep the signups and group comp. This will delete roles and assignments.
Ghostify signups - an alternative to clear signups. It makes all members only visible by admins in the web app.
Automations
Automations have a start time and a "repeat every _ days" number. You can schedule sequences of actions from the time the automation starts to the time when it repeats. Whenever the automation runs its last scheduled sequence, it will renew all the signup IDs and push all the start times forward by the number of days in your "repeat every _ days".
Sequences
Sequences are ordered lists of steps/ actions. They are executed in the order shown in the UI. Sequences can be scheduled at any time after the automation starts and before it repeats. You can even schedule sequences when, X hours before or X hours after your signups from Signup Creation either starts or ends. It will show you right next to it the time and date when that is.
Signup Creation
Signup creation is like other sequences but is limited to "use template" actions. To ensure that later sequences doesn't try to access or link to signups that don't exist, the signup creation sequence runs first and immediately once the automation starts.
Execution reporting
When running a sequence, each step will record when it was executed and if there were any errors. If There were any errors, the reason will be shown below the offending step. Whenever a step runs into an error, the sequence will stop and the owner of the automation will be notified by Prepi in a DM. You can change who of the admins will be notified when editing the automation.
Types of steps / actions
Use Template allows you to make a signup based on a template. You can choose a new start time and whether or not to keep signups from the template.
Post Signups will post a signup embed in the chosen Discord channel much like the "/signup link" bot command.
Post in channel will post the given text to the chosen Discord channel.
Send DM will send the given text to one of the teams signup managers or assistants.
Request Confirmation will post a request embed in the chosen Discord channel like the "/request confirmation" bot command.
Archive Signup will archive one of the signups created in Signup Creation.
Roster & Groups
All your members and placeholders will display in their respective game role based column on the roster. Groups will automatically populate based on which members are on the roster. Drag your members around as you want.
Update roster
Enable edit roster
- Add to roster: click on green plus button on a benched member
- Remove from roster: click on red minus button on member that is on roster
- Replace member: drag benched member onto the member that is already on the roster. Doing so will also replace any mention of the replaced member in the rest of the document.
Adding placeholders
Placeholders are useful if a member has communicated in other ways intention to attend but haven't signed up through Prepi or to just play around with.
There's three ways of creating placeholders
- Clicking the add placeholders button in the roster when the signup is empty
- Clicking get 25 placeholders under admin options in the top right
- Clicking create custom placeholders then selecting a specialisation and typing the name of the placeholder to create a single placeholder
You can copy your group composition as csv and import the text into game addons with csv import support to automatically re-order your in-game groups with 1 click.
Roster colored dots
You may see two colored dots next to a signup members name in the roster. If you've turned on signup confirmations you will see either an orange or green dot on non-placeholder members: green means confirmed, orange means not confirmed. Blue dots are for members marked as standby.
Roles
Roles are the middle step between your people and what you want them to do. If you have repeating actions across multiple places which you need the same member to do, create a role and re-use that role in all those places.
To minimise assignment maintenance, it is recommended to use roles as much as possible when building your assignments. That doesn't mean always, but it usally turns out to be quite close.
Create a role
- Enable edit mode
- Write a label for the new role and select what kind of role it is
- Click add new role
Add a member reference
There's two ways of adding a member reference
- Drag a member from the roster or groups into the role
- Click into the open space inside the role to open replace with, then start typing what you're looking for.
Role usage
To reference a role in assignments you can either
- Drag a role into a valid cell in assignments
- Either click an open cell in assignments or click an occupied cell and select replace with, then type what you're looking for.
- Click role label and select copy to, then select the cell you want to copy into.
Smart lists
You can use smart lists to create assignments that adapt to your roster based on conditional logic. Create the setup you want and let Prepi take care of your assignments.
Good to know
- Members can only appear once inside a smart list.
- There's no limit to how many times you can add the same smart list into a grid panel.
Using smart lists in assignments
- Enable edit mode
- Click in an empty grid member cell and select your smart list
- Drag the smart list instance over the area you want
- Optional: change the spread direction by clicking the button top left of the smart list instance.
The smart list instance will then spread members into any non-filled cell. Types of non-filled cells:
- Empty member cells
- Cells that haven't been filled by higher priority smart list instances
- Cells that has a role that is empty
Think of it this way “if there's nothing else in the cell, the smart list will fill it”.
Moving and resizing
To move the smart list instance you drag the instance button in the top left of the cells. To resize it, you drag the handle in the bottom right.
Spread priority
Whenever you add another smart list instance to a grid panel, it will be added to the priority list. The instances with the highest priority will be filled first and any filled cells will be skipped by lower priority smart list instances. You can change the spread priority by clicking the button at the center top of the grid panel and drag and drop the order to your liking. There is no limit to how many smart list instances you can add to a panel. Multiple instances of the same smart list is allowed. You can create extremely intricate assignments this way just by adding different smart list instances and prioritising them.
Overriding smart lists
After you've put a smart list into assignments, there are a few ways you can customise it further.
Spec swap panel
Spec swap panel will change a members spec in all the specific assignments panels you can see at the same time. It will not affect general assignments and it will also not affect any other section. If you've broken down an encounter into sub-phases, you can use linked panels to keep each sub-phase spec swap panel in sync.
Overriding a specific cell
If you need to override a cell you can click it and change the content of it. If you fill the cell, the smart list instances will then skip it. Overriding with a member will only show if the member is on roster. This isn't only useful for last minute changes, but also helpful to create more deterministic output. It's often helpful to allow members to have the same positioning and perform the same actions to build muscle memory.
Pro techniques
- layer two or more smart list instances on top of each other to use as many of the preferred members you have, then fill with less preferred members.
- To create self levelling columns where you want to put particular members in one column: you can add each rows rules before the next. For instance: List A in column 1, list B in column 2, list C in column 3, then repeat for every row
- use cell overrides to create make sure people are placed in the same spot every time.
Create smart lists
Custom smart lists may not be available to all users. You may create a smart list by following the steps below:
- Enable edit mode and
- Navigate to Smart lists
- Click "Add Smart List"
Smart lists can contain the following types of content:
Link
A link is a link to another smart list. It will add the members in the same order from the linked smart list as long as the member isn't already used. A member can only appear once in a smart list.
Sublist
Sublists are a way to add members based on conditional logic. Add conditions and set your “filter match” to any or all and the sublist will automatically add members to the smart list results. See conditions & filtering below for more info.
Character
If you want to add a character manually into a smart list, you can add one by clicking “+ Character”, searching for the one you want and selecting to add it. For the character to be added into the results of the smart list, the member has to be:
- Signed up with that particular character
- Be on the roster.
Conditions
List filter conditions and sublist conditions work the same way.
- Click on the “Add list filter” or “Add condition” to add a new condition.
- Search for a condition such as
- Class
- Spec
- Game role
- You can also use all conditionals in reverse by searching for “not: __“
- Select the conditional to add it
Filtering
List filter
Use list filters to filter out potential members inside the whole smart list. This is especially useful if you want to tweak another smart list by adding a new smart list, linking to the old one and adding a list filter.
Limit
You can add limits to each smart list or sublist to control how many members it results to.
Filter match
- “All conditions” will add a member if all of the conditions are met
- “Any condition” will add a member as long as any of the conditions are met
The default filter match is any, please keep it in mind when using “not conditionals” as it may add more members than anticipated.
Assignments
There are two main parts of assignments: General and Specific. General assignments will always be visible. Specific assignments will only show the content of the currently selected section. Assignments content is divided into different panels. Panel options include grid, target, text, image, spacer.
Specific assignment sections
Specific assignment sections allow you to create and organise endlessly nested content and get back to it quickly.
Add new sections
- Enable edit mode
- Click on one of the plus buttons
- Scale horizontally by clicking the ones to the right of your current sections
- Scale vertically (more nested) by clicking the button below your current sections.
- Write a fitting section label and click enter
Edit existing section
- Click a selected section
- From there you can
- Rename
- Move the section left or right
- Or delete the section and all its content
Assignment panels
Add new panel
- Enable edit mode
- Click one of the options inside the box with dashed borders
Edit panel
You can move the panel left or right by clicking the arrows on the top left side of the panel. You can see each panels order number between the arrows. All panels try to be sorted top left, lower numbers having priority. However if there is an empty spot, panels with higher numbers that can fit into the spot will automatically flow upwards to fill empty spots. You can use spacer panels to counteract this if you have a specific panel layout you're going for.
Delete the panel by clicking the red trash can on the top right.
You can make the panel bigger or smaller by clicking the triple dot menu and selecting enlarge or minimise. Some panel types may have a required minimum size depending on the content inside the panel.
Copy panel
- Click the triple dot button above the panel you want to copy
- Click copy panel
- Select one of the boxes that have now lighted up
Link panel
Linked panels will change the data on all spots that is linked to the panel. When trying to delete a linked panel it will ask you if you want to delete only a single panel or all the linked panels.
- Click the triple dot button above the panel you want to copy
- Click link panel
- Select one of the boxes that have now lighted up
You cannot link a panel into the same section.
Only my assignments
Clicking this button will automatically filter away all the noise from any filterable panel type.
Grid panels filter modes:
- Horizontal - will keep any rows you're referenced
- Vertical - will keep any columns you're referenced
- Single cell - will keep only the cells you're referenced
Keep in mind that the left-most column and column headers will always be visible.
Grid
filterableA grid assignment panel is like a simplified mini spreadsheet. Grids consist of columns with a column header and rows of cells below. Grid cells can contain text, icons or members (& roles).
Fill empty cell
- Click on the cell you want to fill
- Select one of the different options
Edit cell type
- Hover over the cell you want to edit
- Click the edit / pen icon on the right
- Select a new cell type
Fill empty member cell
Either
- drag role or member into cell
- click into the cell and start typing in replace with
Editing grid layout
Click edit grid on the grid panel you want to edit.
Add row or column by clicking the plus buttons to the right or below the grid. The new row or column will use the cell type from the previous row or column.
To move, duplicate or delete columns or rows:
- First select the rows or columns you want to edit
- then either
- Click the arrows to bump up/down or left/right.
- Click the copy button to duplicate.
- Click the red trash can button to delete
Game icons
Game icons are supported in column headers, text and icon cells and target assignments as well. Just search for what you want. There's thousands of possibilities.
Grid sizes
Grids will not allow you to minimise beyond a point. The more grid columns you have, the bigger it needs to be.
One thing to note about grid sizes are the longer they are horizontally, the more awkward they will look on mobile devices. If this is any concern to you, see if you can split the grids into smaller grids.
Target
filterableA target assignment panel is a single column grid. Use it when you need some simple assignments where multiple people have to do something around another member. You can add an icon by clicking the empty box to the left of the main cell.
Spec Swaps
filterableA spec swaps panel is a quick way to show spec swaps for a particular section. Click 'add swap' to search for a member, then click on the spec you'd like the member to swap to. It will automatically select a spec that has a different game role if one is available.
Image
You can link to an existing image by supplying the URL directly to any image on the internet. Then resize the panel to the size you want.
Prepi does not provide direct file uploads (yet), so feel free to use your favourite free image hosting platform.
Text
Prepi comes with a simple collaborative text editor you can use to convey your ideas in text format. The text editor is collaborative, so multiple users can edit the same text at the same time. You can also use undo (ctrl/cmd + z) and redo (ctrl/cmd & shift + z) on your own edits.
Spacer
If you're trying to create a specific panel layout you can use spacers to change the panel flow. A desktop sized monitor will normally show 4 panel columns. A mobile device will only show one.
Choose between a spacer with a set column span or a spacer which will fill the rest of the row.
The rest of row spacer will disappear when it's no longer needed. Say you want to utilise the first 3 of 4 columns, you can put a rest of row spacer in the 4th column and when seen on a device that can fit 3 columns, the spacer will be hidden.
Discord bot sync
Discord embeds updates in two different ways
User interacts with Discord embed
Interacting with an embed in Discord will always update the embed data.
User interacts with web app
Whenever an admin uses '/signup link', '/request confirmation' or other commands that link to signup data, Prepi will save that embed and update it when changes happen through the web app. The number of embeds you can link to at once may depend on your teams feature access level.
Time savers
Replace with
Replace with is an auto-complete search field that you can use to quickly fill or replace a cell reference. You can search for member character names, classes, specs and roles.
Cell memory
All role and assignment cells remember their previous role or member references even if the member signs off or the role is emptied and the cell looks empty. Why is this important? Because say you clear all signups and people sign up again, all the smart lists, roles and assignments will be automatically populated as they were before you cleared signups.
Because of this we recommend using an assignment document at least once before turning it into a template. When you then use that template to create new assignments you won't have to drag back the members each week.